How to install a Dine-A-Chook Feeder or Drinker
Installing your Dine-A-Chook Poultry Feeder or Drinker is easy. Not only do we provide everything you need in the complimentary Mounting Kit or extra Wire Mesh Mounting Kit, but we have step-by-step, illustrated instructions below. Mounting your Feeder or Drinker according to these instructions is a requirement of our product warranty.
These instructions apply to:

For other information about using a Dine a Chook Feeder, click here.
Where to put your Feeder or Drinker
All Dine a Chook Feeders and Drinkers can be installed outside, as they are made of UV-treated ASA thermoplastic designed for outdoor use. They won't break or become brittle if exposed to sunlight, although colour fading is possible.
However, we recommend installing all units in the shade. Direct sunlight will warm the contents of Feeders and Drinkers, including Automatic Drinkers. Warm feed spoils more quickly, and chickens prefer cool water and may become dehydrated if their Waterer becomes warm.
All Feeders and Drinkers should be protected from livestock, except for poultry, and wildlife. For this reason we recommend installing them inside the chicken coop or a pest-proof run. Although our Feeders are designed to deter pest animals, they are more likely to be used by rodents and wild birds if installed outside of the chicken coop.
Feeders and Drinkers can be installed on a solid surface, such as the wall of a chicken coop, or on wire mesh using a wire mesh mounting kit. If you do not have a suitable surface, here are some more innovative installations:

Choosing the correct mounting height
The correct mounting height for a Dine a Chook Feeder and Drinker varies depending on the type of poultry, breed and age of the birds. Choose your mounting height to suit the largest bird in your flock and provide a step for smaller birds.
In mixed flocks where size differs, we recommend installing 2-3 units at different heights. In flocks of mixed poultry, ducks and even geese will usually happily use Feeders and Drinkers that have been mounted for chickens to feed comfortably.
Always monitor new Feeders and Drinkers carefully after installation to ensure that all birds can comfortably access the feed and/or water, and adjust the height as needed.

Feeder height
Dine a Chook Feeders are designed to be mounted so that the feeding bay is at “chicken height”. This means at roughly the height of the back of the bird’s neck, about 100-150 mm off the floor.
Mounting your Feeder at the correct height is important for the waste-reducing and pest-deterrent features to work correctly, as well as for your birds to eat comfortably.
Some chicken keepers choose to mount their Feeder higher and provide a step for all of their birds, as this will make it more difficult for pests to access the feeding bay.
Drinker Cup height
Drinking Cups should be mounted at bird eye-level.
Nipple Drinker Outlet height
Nipple outlets are designed to be mounted above bird head height. Install Nipples so that chickens drink at a 45o angle above head height. While birds should be reaching up, it is important that they are not required to stretch their neck to reach the Nipple.
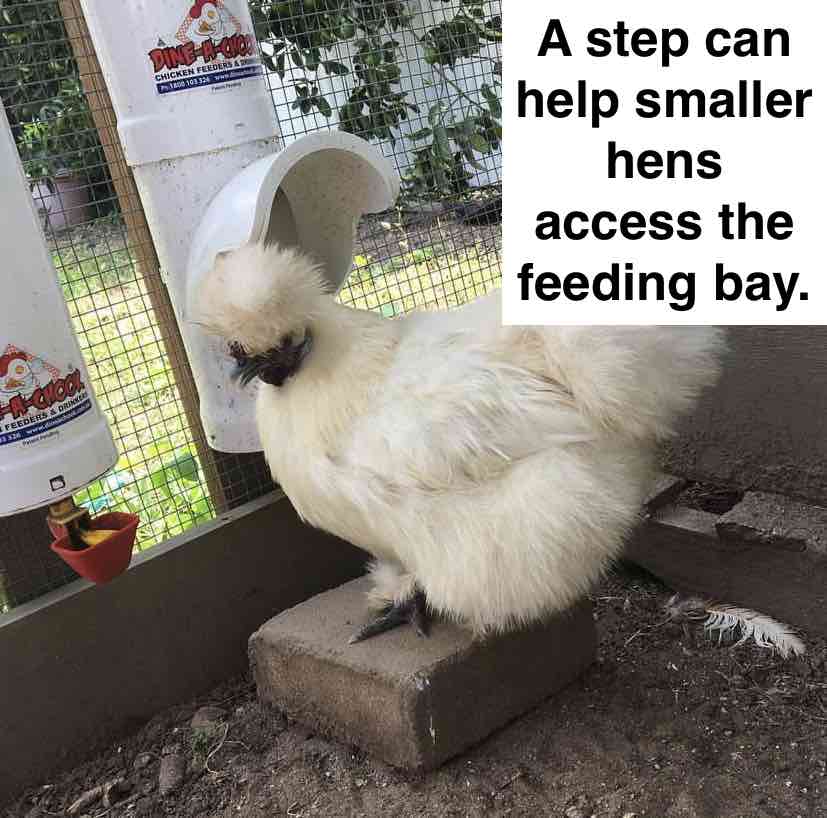
Providing a step
Where a Feeder or Drinker is mounted for larger birds, a step can be provided for the smaller birds in your flock. Anything sturdy, such as pavers, bricks or timber, will do.
Steps can be placed directly in front of the Feeder or Drinker. In a situation with various sized birds, it is recommended that steps are placed slightly to one side.
Dine a Chook Feeder and Drinker Installation Instructions
Please note the following points:
- Feeders and Drinkers must be installed using the custom-made steel brackets supplied in the complimentary Mounting Kit. They should never be hung directly by the rear mounting hooks, with string or wire, or by any other means.
- Although most units have 3 rear mounting hooks, they should be mounted using the top and bottom hooks
- Brackets must be snug against the top of the hooks and weight evenly distributed between both hooks
- For installation on wire mesh, we recommend purchasing a Wire Mesh Mounting Kit
- Failure to follow these instructions may void the product warranty
For Drinkers with Lubing Cups, we recommend changing over the Drinker Cup Floats prior to installation.
Solid surface installation
Follow these instructions to install your Feeder or Drinker on a solid surface such as timber, steel or masonry.
To install your Feeder or Drinker unit, you will need:
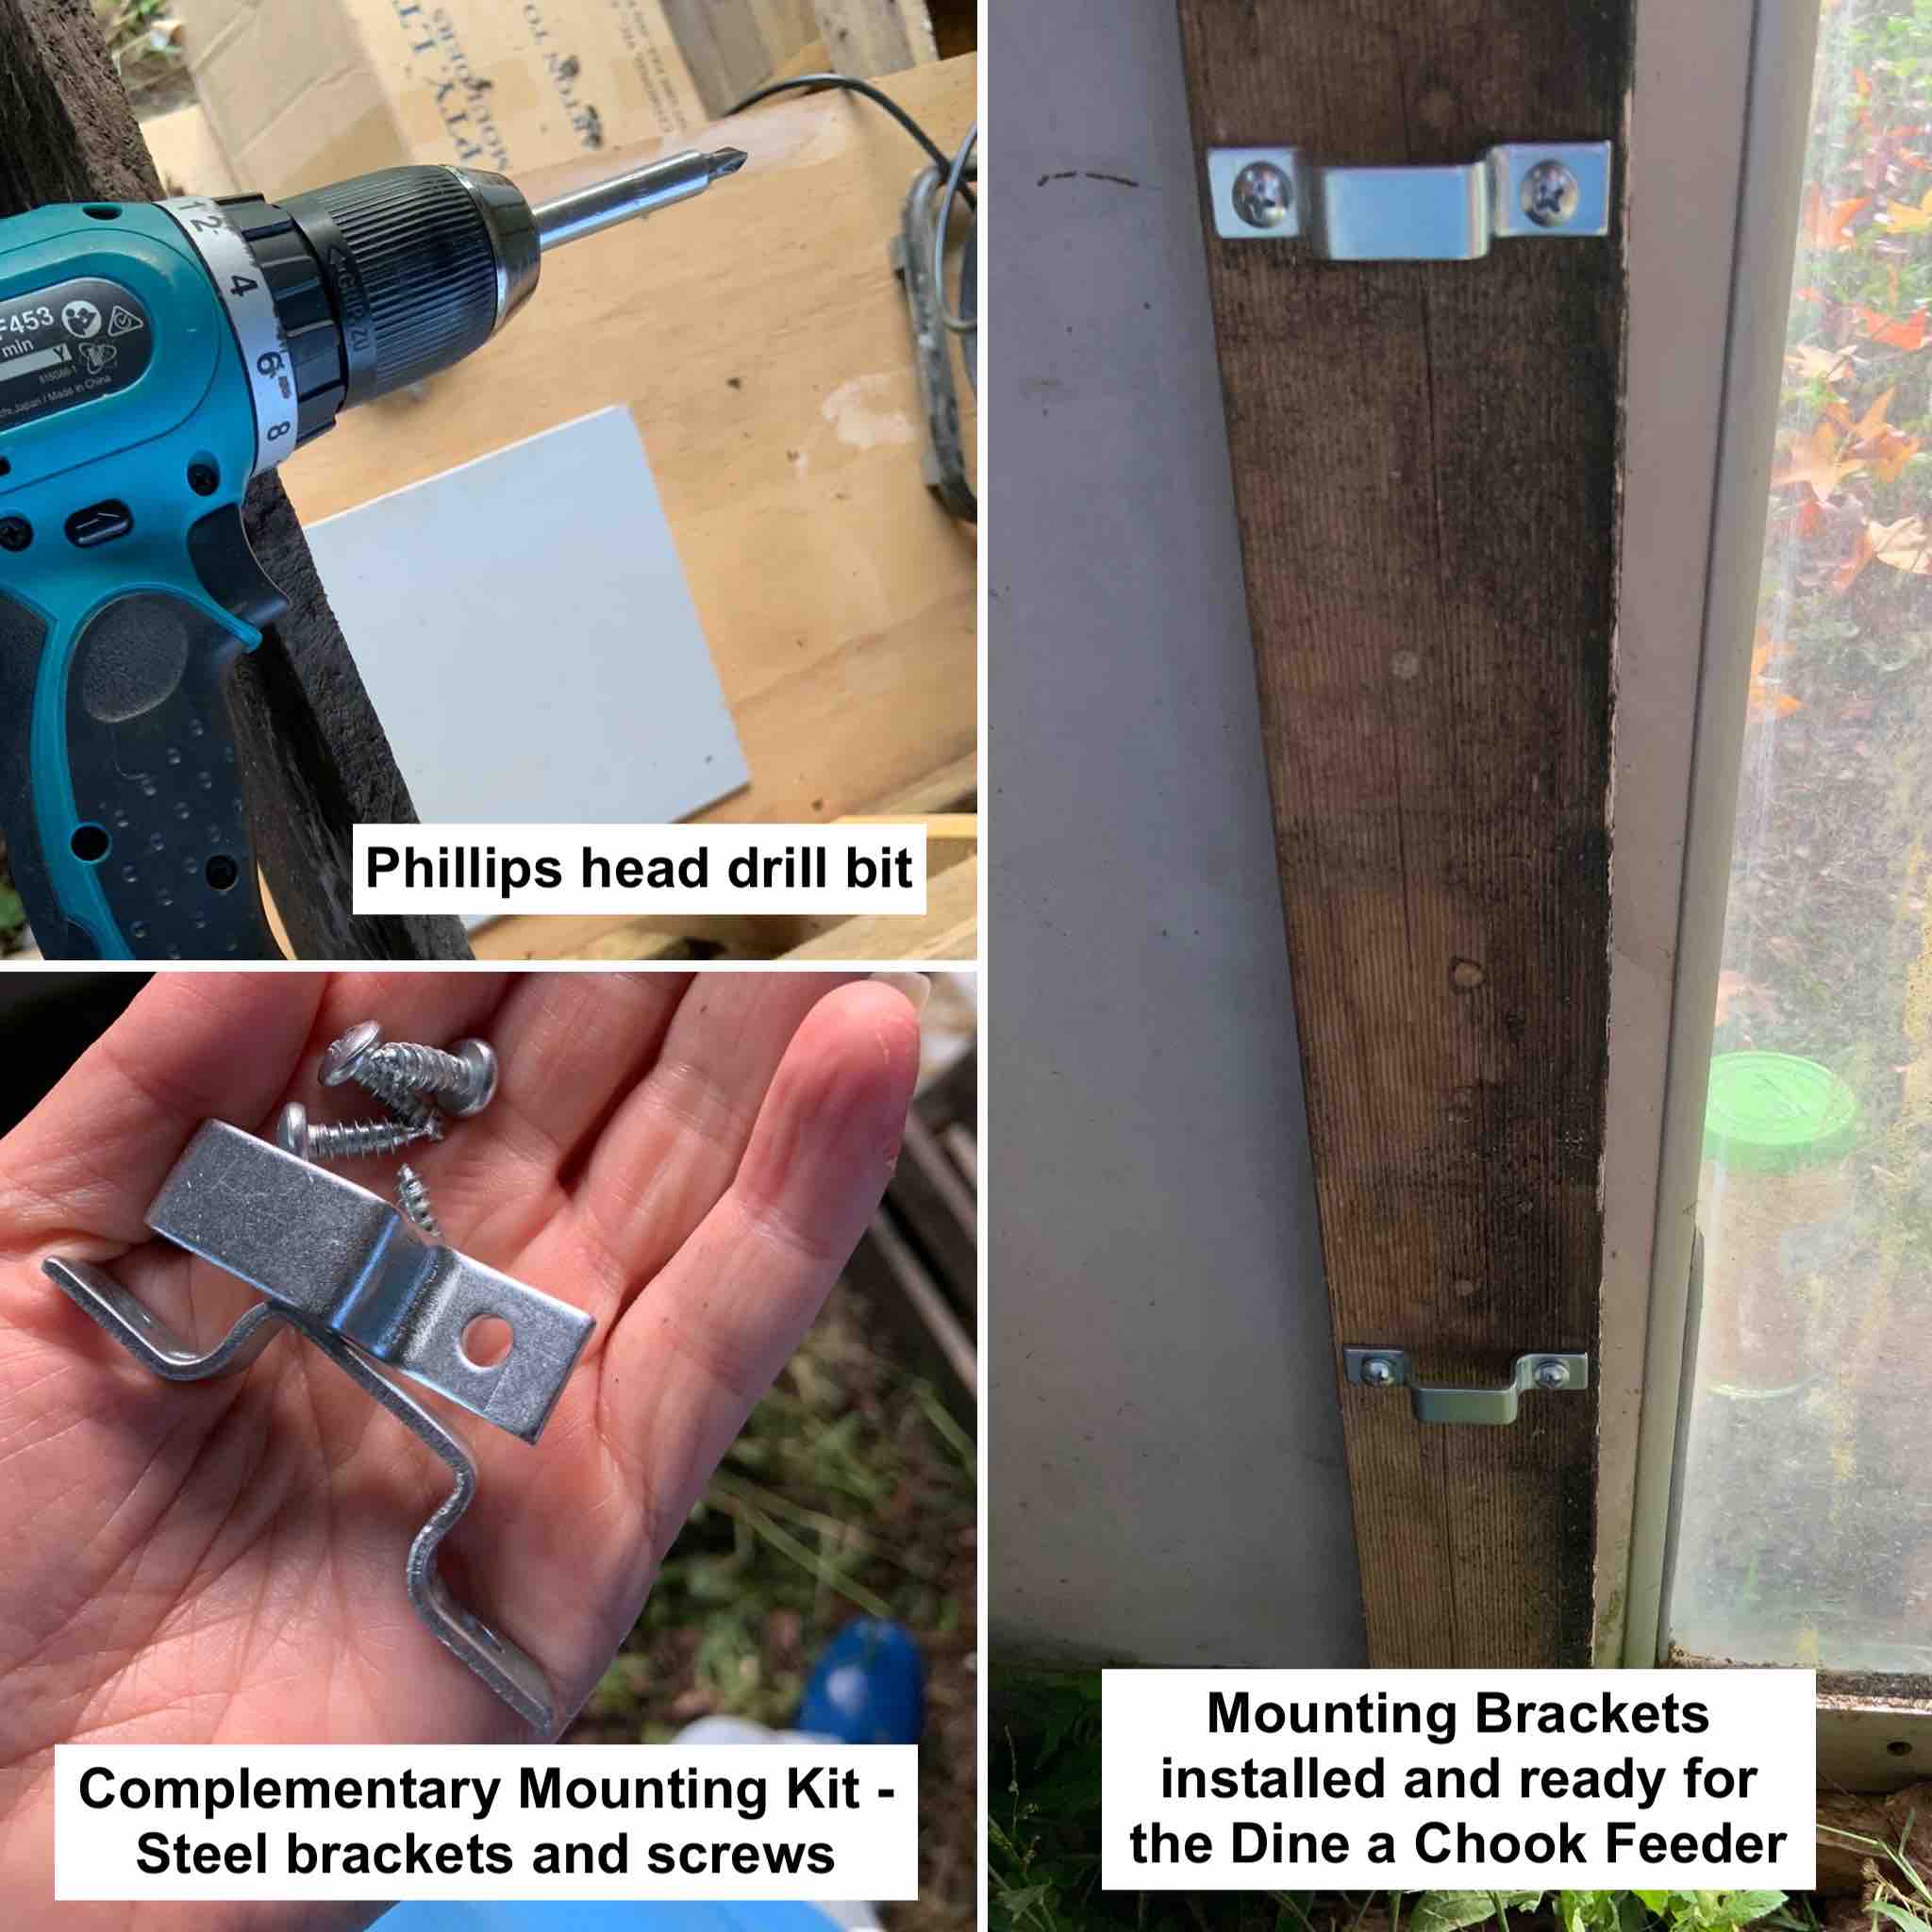
1 x Complementary Dine a Chook Mounting Kit (2 steel brackets + 4 screws)
1 x Drill with a Phillips head bit
For installation on concrete or masonry, alternative screws may be required.
Steps to install a Dine a Chook Feeder or Drinker on a solid surface:
- Determine the correct height for the Feeder or Drinker (see above)
- Slip a steel bracket onto the top mounting hook
- Hold the unit against the mounting surface at the correct height
- Mark the bracket location or simply hold the bracket firmly in place and remove the unit
- Screw the bracket into place using the supplied screws. On some surfaces, you may need to pre-drill a hole in which case marking the bracket location is recommended.
- Hang the unit from the top bracket
- Slip the second bracket onto the bottom mounting hook, ensuring it is snug at the top of the hook so that weight is distributed equally between both brackets
- Mark the location of the second bracket or hold in place and remove the unit
- Screw the second bracket into place
- Hang your Feeder or Drinker unit and check that weight is evenly distributed between the mounting hooks
Always monitor your flock after installing a new Feeder or Drinker to ensure all birds can access the unit comfortably.

Wire mesh installation
All Dine a Chook Feeders and Drinkers come with a complementary Mounting Kit. For wire mesh installation, we recommend the additional purchase of a Wire Mesh Mounting Kit.
Please note that units must be hung using the supplied mounting brackets to meet warranty conditions and should not be hung directly onto wire mesh using the rear mounting hooks.
To install your Feeder or Drinker unit, you will need:
1 x Complementary Dine a Chook Mounting Kit (2 steel brackets + 4 screws)
1 x Dine a Chook Wire Mesh Mounting Kit (4 bolts, 4 washers + 4 nuts)
You may need pliers and/or a shifter to tighten the nuts. An additional person to help is also handy.

Steps to install a Dine a Chook Feeder or Drinker on wire mesh:
- Determine the correct height for the Feeder or Drinker unit (see above)
- Slip a steel bracket onto the top mounting hook
- Hold the unit against the wire mesh at the correct height
- Slip a bolt through the bracket and mesh, ensuring it is resting on a horizontal wire
- Slip a washer and nut onto the back of the bolt and tighten loosely
- Repeat on the other side of the bracket and then tighten both sides evenly
- Hang the unit from the top bracket
- Slip the second bracket onto the bottom mounting hook, ensuring it is snug at the top so that weight is distributed equally between both brackets
- Slip a bolt through the bracket and mesh, ensuring it is resting on a horizontal wire
- Slip a washer and nut onto the back of the bolt and tighten loosely
- Repeat on the other side and then tighten both sides evenly
- Hang your Feeder or Drinker unit and check that weight is evenly distributed between the mounting hooks
Always monitor your flock carefully to ensure all birds are able to comfortably reach the feed or water.

For more information, including tips for using a Dine a Chook Feeder and Lubing Cup maintenance, visit our Instructions page.