How to install a Dine a Chook Automatic Drinker
Installing your Dine a Chook Automatic Poultry Drinker is easy. You can install your Drinker using the complimentary Mounting Kit and simple household tools - no plumber required!
Look below for step-by-step instructions for each Automatic Drinker model. You will learn how to mount your Automatic Drinker and how to connect it to a water supply. Installing your Drinker according to these instructions is a requirement of our product warranty.
Contents
Click to jump directly to the section you need:
1. Where to install an Automatic Drinker
2. Correct Drinker mounting height
3. Compact Automatic Drinker installation
4. Automatic Mains Pressure Drinker installation (black header tank)
5. Automatic Drinker Maintenance and Use
1. Where to put your Automatic Drinker
All Dine a Chook Drinkers can be installed outside, as they are made of UV-treated ASA thermoplastic designed for outdoor use. They won't break or become brittle if exposed to sunlight, although colour fading is possible.
However, we recommend installing all units in the shade. Even with an Automatic Drinker, the water inside will become warm if the Drinker is in direct sunlight. Chickens prefer cool water and may become dehydrated if their Waterer becomes warm.
Automatic Drinkers should be installed as close to the water supply as possible.
Drinkers should be protected from livestock, except for poultry, and wildlife. For this reason we recommend installing them inside the chicken coop or a pest-proof run.
2. Choosing the correct mounting height
The correct mounting height for a Dine a Chook Drinker varies depending on whether you have chosen a Drinker Cup or a Nipple Outlet.
The type of poultry, breed and age of your birds will also make a difference. Choose your mounting height to suit the largest bird in your flock and provide a step for smaller birds.
In mixed flocks where size differs, we recommend installing 2-3 units at different heights. In flocks of mixed poultry, ducks and even geese will usually happily use Drinkers that have been mounted for chickens to drink comfortably.
Always monitor new Drinkers carefully after installation to ensure that all birds can comfortably access the water, and adjust the height as needed.
Drinker Cup height
Drinking Cups should be mounted at bird eye-level.

Nipple Drinker Outlet height
Nipple outlets are designed to be mounted above bird head height. Install Nipples so that chickens drink at a 45o angle above head height. While birds should be reaching up, it is important that they are not required to stretch their neck to reach the Nipple.
Providing a step
Where a Drinker is mounted for larger birds, a step can be provided for the smaller birds in your flock. Anything sturdy, such as pavers, bricks or timber, will do.
Steps can be placed directly in front of the Drinker. In a situation with various sized birds, it is recommended that steps are placed slightly to one side.
3. Dine a Chook Compact Auto Drinker Installation Instructions
Please note the following:
- This unit requires a mains pressure water supply. It is not suitable for gravity feed.
- Drinkers must be installed using the custom-made steel brackets supplied in the complimentary Mounting Kit. They should never be hung directly by the rear mounting hooks, with string or wire, or by any other means.
- Units should be mounted using the top and bottom hooks
- Brackets must be snug against the top of the hooks and weight evenly distributed between both hooks
- This Drinker must be mounted on a solid surface. It cannot be mounted on wire mesh even with a Wire Mesh Mounting Kit.
- Failure to follow these instructions may void the product warranty

Steps to install your Compact Auto Drinker
- Change over the Lubing Drinker Cup floats
- Install the Drinker Unit on a solid surface
- Connect the mains water supply
- Monitor your unit
1. Change over the Lubing Drinker Cup floats
The additional floats provided with your Lubing Drinker Cups are not spares. For most chicken keepers, we recommend changing the Lubing Cup floats over prior to use.

The original Lubing Cup floats work perfectly well for chickens and poultry. However, they are designed to only allow a little water in the Lubing Cup. This doesn't affect how your chickens drink and the original floats do not have to be changed. However, most backyard poultry keepers prefer higher water levels in the Drinker Cup. This can be achieved by changing the Lubing Drinker Cup floats over to the complimentary Dine a Chook floats provided with your purchase.
To change your Lubing Drinker Cup floats:
- Use pliers to gently grasp the pin at the side of the Drinker Cup
- Remove the pin halfway and the float will fall out
- Leave the pin half way
- Hold the desired float in place
- Gently push the pin back into its original position to secure the float

2. Install the Drinker on a solid surface
Follow these instructions to install your Drinker on a solid surface such as timber, steel or masonry.
To install your Drinker, you will need:
1 x Complementary Dine a Chook Mounting Kit (2 steel brackets + 4 screws)
1 x Drill with a Phillips head bit
For installation on concrete or masonry, alternative screws may be required.
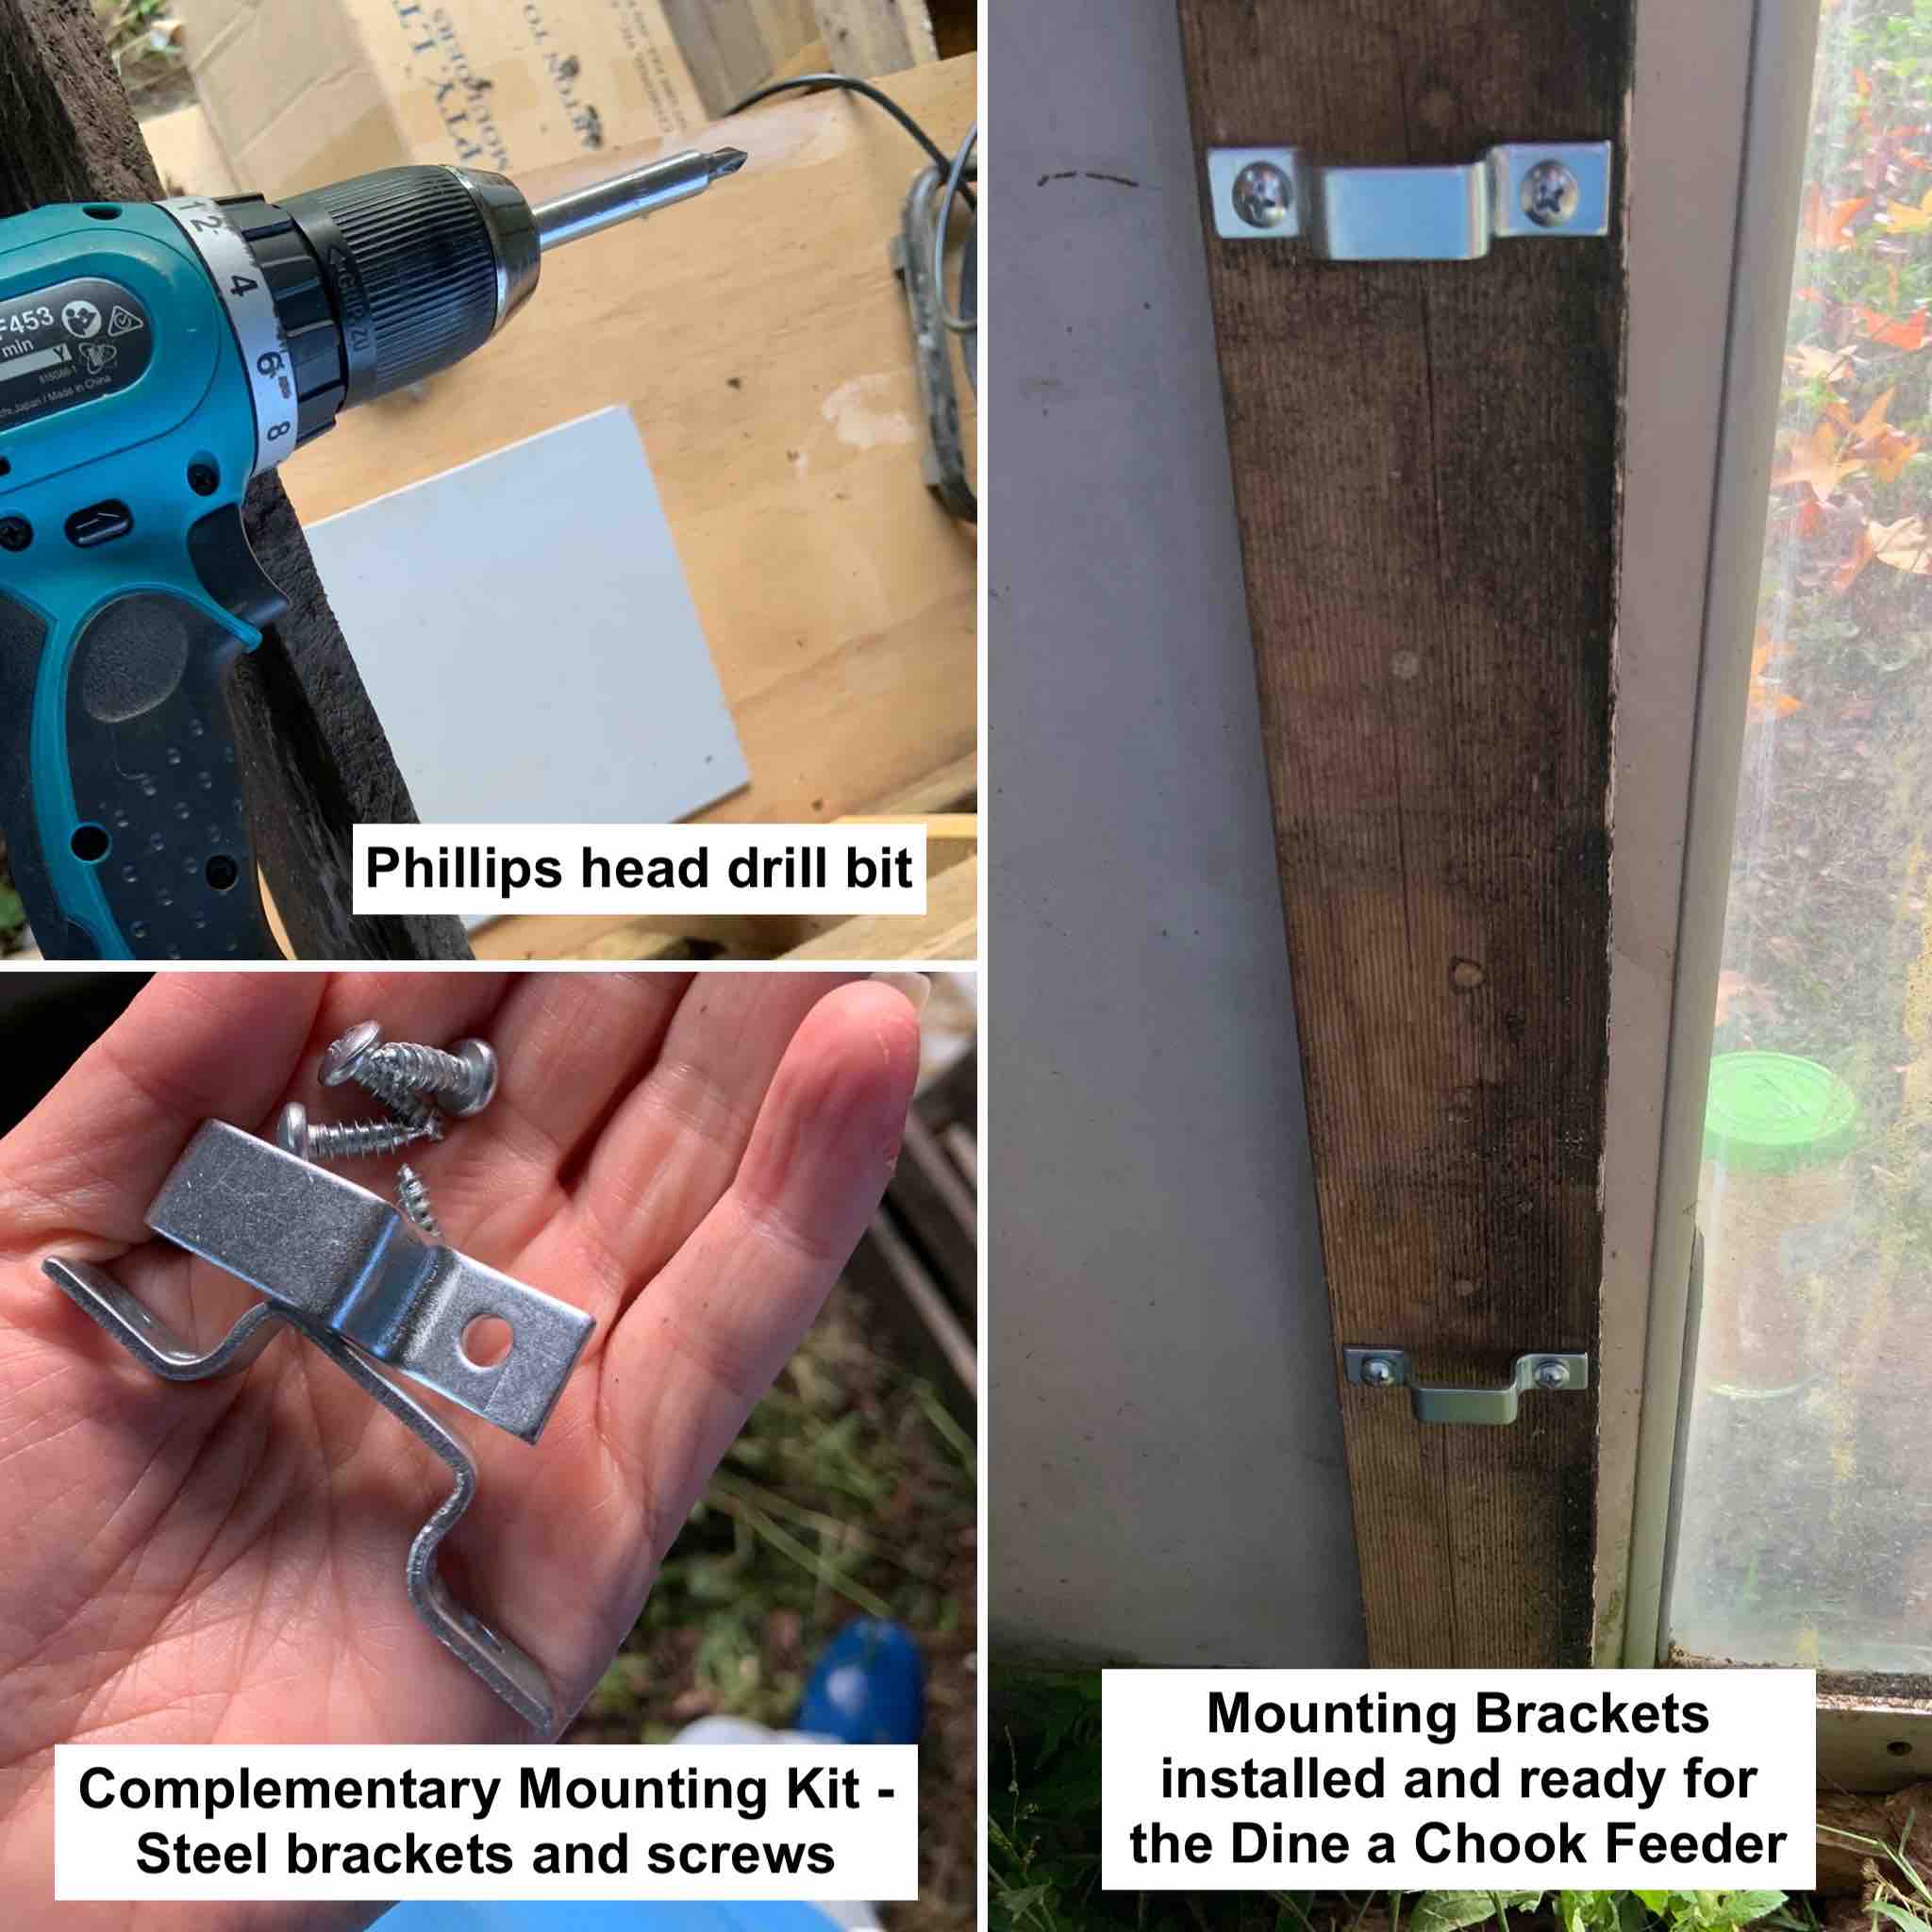
Steps to install a Dine a Chook Feeder or Drinker on a solid surface:
- Determine the correct height for the Drinker (see above)
- Slip a steel bracket onto the top mounting hook
- Hold the unit against the mounting surface at the correct height
- Mark the bracket location or simply hold the bracket firmly in place and remove the unit
- Screw the bracket into place using the supplied screws. On some surfaces, you may need to pre-drill a hole in which case marking the bracket location is recommended.
- Hang the unit from the top bracket
- Slip the second bracket onto the bottom mounting hook, ensuring it is snug at the top of the hook so that weight is distributed equally between both brackets
- Mark the location of the second bracket or hold in place and remove the unit

- Screw the second bracket into place
- Hang your Drinker. Check that weight is evenly distributed between the mounting hooks and brackets are snug at the top of mounting hooks.

3. Connect the mains pressure water supply
This unit requires a mains pressure water supply. It is not suitable for gravity feed.
To connect to the mains pressure water supply, we recommend using a high-quality garden hose that can withstand constant pressure. However, any standard size 12 mm garden hose can be used. Additional fittings may be required if using PVC or rural poly pipe.
- Check that the rubber seal is in place inside the yellow hose tail
- Screw the hose tail firmly into place, but do not overtighten
- Connect hose to water supply and cut to size, ensuring the hose is loose enough to avoid any pressure on the hose tail once connected
- With the clamp on the hose, but not tightened, push the hose firmly into place on the hose tail
- Clamp tightly
- Turn on the water supply and check to ensure there are no leaks and that your Drinker is filling automatically
That's it. Your new Automatic Chicken Drinker is ready to go!
4. Monitor your new Drinker
After installing a new Drinker, you should always monitor your flock carefully until you are sure that all birds can access the water comfortably. If the Drinker is too high, consider adding a step or move the Drinker to a lower position.
If you have any concerns about your new Drinker or it is not working as it should, please contact us directly.
For more information, including Lubing Cup maintenance, visit our Instructions page.
4. Dine a Chook Automatic Drinker Installation Instructions
Please note the following:
- This unit requires a mains pressure water supply. It is not suitable for gravity feed.
- Drinkers must be installed using the supplied support bracket on a solid surface
- Failure to follow these instructions may void the product warranty

Steps to install your Automatic Chicken Drinker
- Change over the Lubing Drinker Cup floats (Drinker Cup models only)
- Assemble the Drinker
- Install the Drinker Unit on a solid surface
- Connect the water supply
- Monitor your unit
1. Change over the Lubing Drinker Cup floats
If you have chosen a Nipple Drinker Outlet, proceed to Step 2. If you have chosen a Drinker Cup Outlet, read this section carefully.
The additional floats provided with your Lubing Drinker Cups are not spares. For most chicken keepers, we recommend changing the Lubing Cup floats over prior to use.
The original Lubing Cup floats work perfectly well for chickens and poultry. However, they are designed to only allow a little water in the Lubing Cup. This doesn't affect how your chickens drink and the original floats do not have to be changed. However, most backyard poultry keepers prefer higher water levels in the Drinker Cup. This can be achieved by changing the Lubing Drinker Cup floats over to the complimentary Dine a Chook floats provided with your purchase.
To change your Lubing Drinker Cup floats:
- Use pliers to gently grasp the pin at the side of the Drinker Cup
- Remove the pin halfway and the float will fall out
- Leave the pin half way
- Hold the desired float in place
- Gently push the pin back into its original position to secure the float
2. Assemble the Drinker unit
It is necessary to assemble the Drinker unit prior to installation. You have been provided with everything you need:
1 x Black Lubing Header Tank
1 x Dine a Chook Drinker Outlet Frame
1 x 13 mm Nylon Inlet (hose tail)
Lubing Cup or Nipple Outlets, according to your preference
To assemble the Drinker unit:
- Screw the Drinker Outlet Frame into the outlet on the bottom of the Header Tank firmly, do not over tighten
- If using Lubing Cups, place an o-ring onto the thread at the top of each Cup and screw firmly into place on the Outlet Frame, do not over tighten. If using Nipple Outlets, these will already be in place on the Outlet Frame
- Check that the rubber seal is in place inside the the Nylon Inlet valve, then screw firmly into place on the side of the Header Tank, do not over tighten
The internal components of the Header Tank, i.e. the ball valve, come pre-assembled in place and should not be tampered with.
Do not unnecessarily disassemble Outlets and Outlet Frames. A food-grade lubricant has been used on o-rings to create the seal between components. If disassembly is necessary for some reason, spray with olive oil prior to reassembly.
3. Install the Drinker on a solid surface
Follow these instructions to install your Drinker on a solid surface such as timber, steel or masonry.
To install your Drinker, you will need:
1 x Provided Support Bracket and screws
1 x Drill with a Phillips head bit
For installation on concrete or masonry, alternative screws may be required.
Steps to install an Automatic Drinker on a solid surface:
- Determine the correct height for the Drinker Outlets (see above)
- Mark the correct height for the Header Tank, based on the previous step
- Install the Support Bracket using the screws provided
- Fit the Support Bracket to the Header Tank
4. Connect the mains pressure water supply
This unit requires a mains pressure water supply. It is not suitable for gravity feed.
To connect to the mains pressure water supply, we recommend using a high-quality garden hose that can withstand constant pressure. However, any standard size 12 mm garden hose can be used. Additional fittings may be required if using PVC or rural poly pipe.
- Connect hose to water supply and cut to size, ensuring the hose is loose enough to avoid any pressure on the hose tail once connected
- With the clamp on the hose, but not tightened, push the hose firmly into place on the hose tail
- Clamp tightly
- Turn on the water supply and check to ensure there are no leaks and that your Drinker is filling automatically
That's it. Your new Automatic Chicken Drinker is ready to go!
5. Monitor your new Drinker
After installing a new Drinker, you should always monitor your flock carefully until you are sure that all birds can access the water comfortably. If the Drinker is too high, consider adding a step or move the Drinker to a lower position.
If you have any concerns about your new Drinker or it is not working as it should, please contact us directly.
5. Automatic Drinker Maintenance and Use
Dine a Chook Automatic Drinkers should provide years of reliable service with minimal maintenance.
Check connecting pipes and fittings regularly for leaks, wear and tear.
Clean out the header tank as needed and avoid any handling of the interior mechanisms unless a problem occurs.
Most problems with Automatic Drinker Systems are caused by dirty Lubing Cup outlets. We strongly recommended cleaning Lubing Cups every 2-3 months, as per these instructions, and using a clean source of water free from minerals and sediment.
Automatic Drinkers are not suitable for the delivery of medicines or supplements to your chickens. We recommend installing a separate Medication Drinker for this purpose.
Troubleshooting for Lubing Cup problems such as drips or dry Lubing Cups can be found here.