Lubing Drinker Cups
Everything you need to know about Lubing Drinker Cups for chickens and poultry. Includes DIY Chicken Drinker advice.
Contents
Click to jump directly to the section you need:
1. How to change Lubing Cup floats
3. How to clean a Lubing Drinker Cup
For information on DIY Poultry drinkers using Lubing Drinker Cups, click here.
1. How to change Lubing Drinker Cup floats
The additional floats provided with your Lubing Drinker Cups are not spares. For most chicken keepers, we recommend changing the Lubing Cup floats over prior to use.

The original Lubing Cup floats work perfectly well for chickens and poultry. However, they are designed to only allow a little water in the Lubing Cup. This doesn't affect how your chickens drink and the Cups will still fill on demand.
The original floats do not have to be changed.
However, most backyard poultry keepers prefer higher water levels in the Drinker Cup. This can only be achieved by changing the Lubing Drinker Cup floats over to the complimentary Dine-A-Chook floats provided with your purchase.
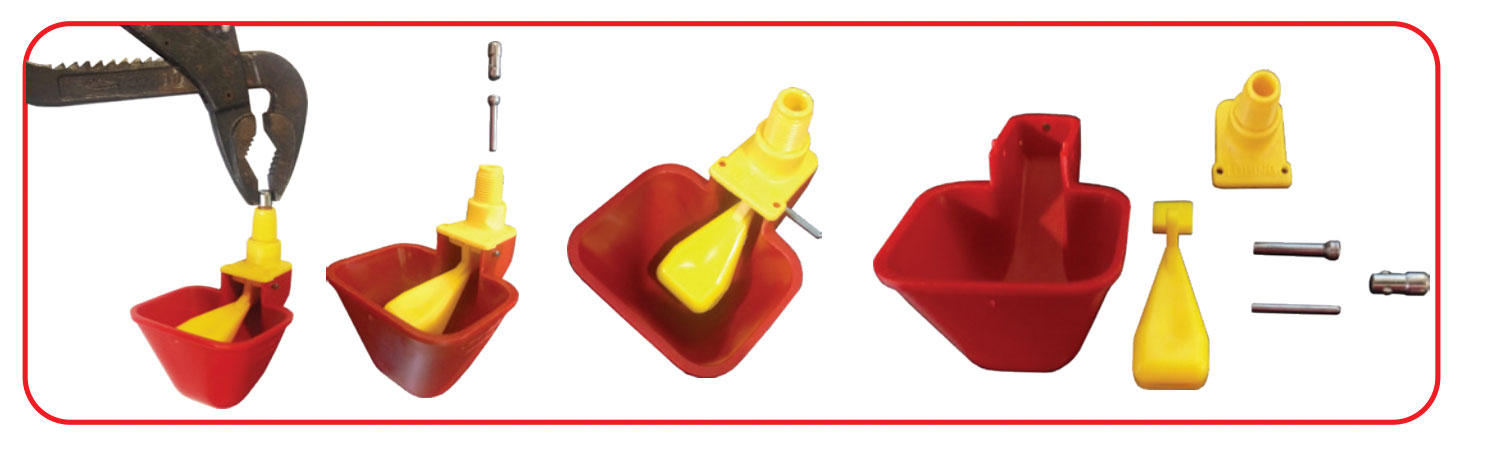
To change your Lubing Drinker Cup floats:
- Use pliers to gently grasp the pin at the side of the Drinker Cup
- Remove the pin halfway and the float will fall out
- Hold the pin halfway
- Put the desired float into place
- Gently push the pin back into its original position to secure the float

2. Lubing Drinker Cup installation instructions
Only connect the Lubing Drinker Cups once the Drinker and Outlet Frame (if using) are in place.
Place an o-ring onto the thread at the top of each cup.
Screw Cups firmly into place. Do not over tighten.

Nipple outlets will already be in place.
3. Lubing Cup cleaning and maintenance
Lubing Cups require the following maintenance:
- Rinse Cups with a low-pressure hose every week, at least, or as needed
- If Cups or floats are particularly soiled, wipe with a damp cloth
- Disassemble and clean thoroughly, as detailed below, every 3 months
Disassembling your Lubing Cups every few months for cleaning will ensure that you get years of reliable use.
Systems using hard water and rainwater may require cleaning more often.
Lubing Cups should never be washed with boiling water or put in the dishwasher. Hand wash with warm water and a soft cloth.
How to clean a Lubing Cup:
Generally, if the lubing cup is only slightly soiled, washing with a low-pressure hose will clean out the dirty water. If the cup or float are looking like they need a bit more attention, then soak them in warm water and wipe with a clean cloth.
If however they require a thorough clean, follow the step by step instructions guide below on how to disassemble a chicken lubing cup for cleaning.
Time needed: 10 minutes.
- Remove Lubing Cup from Drinker
Gently unscrew Lubing Cup from Drinker or Outlet Frame, being careful not to lose the o-ring.
Once you have the Lubing Cup free of the Drinker/Frame, remove the o-ring and set aside until reassembly.
- Remove nipple valve
Use multigrip pliers to pull the nipple valve out of the top of the Lubing Cup. Note that the valve has two parts.

- Remove the float
Using the pliers, gently grasp the pin at the side of the Lubing Cup and remove. The float will fall out.
- Wash all components
Hand wash the Lubing Cup components in warm, soapy water using a soft cloth. If the Cup is particularly soiled, you may need to soak for a little while.
Do not scrub. Do not use boiling water. Do not place in the dishwasher.
Rinse well.
- Reassemble
To reassemble, hold the float in place and push the pin back into place.
Replace the valve, ensuring the smaller pin goes in first.
With your fingers, check that the pin and nipple spin freely. As long as the pin and nipple spin, the system will work correctly.
Keeping your Drinker Cups clean by rinsing each week and disassembling regularly will ensure years of problem-free use. Problems such as leaks, drips and a failure to refill are often caused by dirty Lubing Cups.
4. Lubing Drinker Cup Troubleshooting and FAQs
With care, Lubing Drinker Cups will provide years of reliable hydration for your chickens and poultry.
Most problems with Lubing Cups are caused by sediment or dirt in the Cup mechanisms. Cleaning your Lubing Cup regularly, as detailed above, and using clean water can prevent such problems. Consider an in-line water filter if you are using rainwater or bore water.
Drinker design is another common cause of Lubing Cup problems. Either the water pressure is too high, or the Drinker has an airlock.
Read on to troubleshoot some of the most common Lubing Drinker Cup problems.
The Drinker Cup is not refilling automatically
There is a difference between Drinker Cups refilling automatically and a dry Drinker Cup. If no water is flowing into the Drinker Cup, even when you press on the float, see the next section.
If the Drinker Cup is not refilling automatically, the most common explanation is that you have not changed over the Lubing Cup floats.
Gently press down on the float. Does water flow into the Cup?
If water flows into the Cup when you press on the float, then the Drinker Cup is working correctly. The original Lubing Cup floats only release water on-demand, so the Cup can appear dry. This does not mean that the Lubing Cup is not working. Chickens and poultry have no trouble finding water or drinking from the original floats.
If you would prefer the Drinker Cups to refill automatically and have higher water levels, change the float from the Lubing Cup original float to the complimentary Dine-A-Chook float provided with your purchase.
Dine-A-Chook floats are designed so that the Drinker Cup will automatically refill and to have a higher water level in the Cup.
There is no water in the Drinker Cup
This section is for where there is no water in the Lubing Cup and water does not flow in freely when the float is pressed.
There are several possible explanations for a dry Lubing Cup.
To troubleshoot:
- Check that there is water in the Drinker reservoir
- Ensure that there is not an accidental air-lock. An air-lock occurs when the Drinker reservoir becomes sealed against air being able to enter. This will prevent water from flowing into the Lubing Cup. Open reservoir lid, listening for a soft popping or hissing which may indicate an air-lock has occurred, and close loosely. Air-locks are most common in DIY systems using your own water reservoir but can occur in any system if the lid is blocked or over tightened.
- Look in the bottom of the Drinker to ensure there is no sediment that could block the Lubing Cup. If you can see sediment, empty out the Drinker, clean the Lubing Cup as above and refill the Drinker with clean water
- The Lubing Cup valve could be stuck or blocked. Remove the Cup from the Drinker and check that the nipple valve at the top of the Cup can spin freely. If the valve does not spin freely, clean the Cup thoroughly using the instructions above and reassemble.
The Drinker Cup is leaking, dripping or overflowing
There are four common causes of a leaking or dripping Drinker Cup:
- The Lubing Cup needs cleaning
This is most common in Drinker systems using rainwater or hard water.
If sediment becomes caught in the nipple valve inside the Lubing Cup, it can cause the Cup to leak, drip or overflow. Try disassembling and cleaning the Lubing Cup thoroughly, as well as cleaning and refilling the Drinker reservoir.
If this is a common problem, a water filter can reduce sediment and prevent Drinker Cup valves from becoming blocked.
Material such as bedding or grass becoming caught above or on the float in the Drinker Cup can also cause drips.
- The water pressure is too high
Lubing Cups are specifically designed for low pressure systems. If system pressure is too high, then Lubing Cups may leak, drip or overflow. This will only occur with DIY systems or incorrectly installed Automatic systems.
Lubing Cups should never be connected directly to an automatic water supply such as mains water or gravity feed from a tank. A header tank must be used.
The head pressure of the water supply for Lubing Drinker Cups should never exceed 35 cm. You can calculate head pressure by measuring the distance from the Lubing Cup to the highest point of water. If this distance exceeds 35 cm, then the head pressure is too great and is causing the leakage. In calculating head pressure, water volume doesn't matter, just distance!
Reduce the head distance to 35 cm. Or if this is not possible, install a header tank.
Before setting out to solve this problem, you can ensure it is the cause of the leak or drips by testing your Lubing Cup Outlet on a system where the head pressure definitely isn't too high, such as one of our 20 L Drums.
- There is a problem with the seals on the Drinker
Disassemble the Drinker and check carefully.
Are all of the o-rings in place and intact where the Lubing Cups join the Outlet Frame? Are there any other seals or o-rings that are missing or degraded? If you are not sure, send us some photos or call us.
Buy replacement o-rings - The Drinker Cup has been over tightened or under tightened
Unscrew the Cup from the Outlet Frame, check the o-ring and re-connect. Spraying lightly with some olive oil before replacing may help improve the seal. When reassembling, ensure the Cup is screwed firmly into place, being careful not to over or under tighten.
The float is stuck
Very occasionally, food or floor litter can be flicked into a Lubing Drinker Cup and cause the float to stick. Remove the Lubing Cup float, clean and replace. You should also clean the internal nipple mechanism as per the instructions above.
If you are still having Lubing Cup problems, please Contact Us. We have years of experience with DIY Poultry Watering Systems and are happy to help.
FAQ: What types of birds can use a Lubing Cup?
Poultry, waterfowl and most game birds and aviary birds will happily drink from a Lubing Cup. However, Nipple drinker outlets are often preferred for waterfowl, to prevent them from spilling and fouling the water. Nipple drinkers may be preferred for some game and aviary birds, such as quail, also.
FAQ: What age bird can use a Lubing Cup or Nipple Drinker?
Poultry, waterfowl and game birds can use a Lubing Cup or Nipple drinker from hatching. New chicks in a brooder need to be shown how to drink from the Lubing Cup or Nipple, just like with any waterer.

Shop for spare parts and replacements for Dine-A-Chook drinkers