How to Build a $20 Chicken Coop
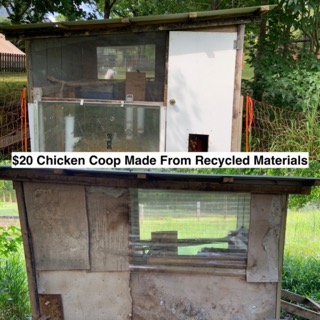
My $20 Chicken Coop
Getting chickens doesn’t need to be expensive. It all depends on how much money you want to spend.
When getting chickens, one of the biggest expenses is the chicken coop. But it doesn’t have to be. Last year, we built a new chicken coop for under $20. That’s less than the cost of a laying hen!
Let’s be clear, the $20 coop will not last forever. It’s not that well-made! But it is not supposed to be my “forever coop”, I only need it to last for a few years. If it was my “forever coop” there are definitely a few things I would do differently.
But for an almost-free chicken coop, my cheap $20 DIY chicken coop does the job of sheltering and protecting my chickens.
Materials to build a cheap chicken coop
A chicken coop needs to contain your chickens and protect them from predators. It also needs to be weather-proof, cosy in winter and cool in summer. And, of course, you need roosts and nesting boxes!
The trick to building a cheap DIY chicken coop is using free materials and doing the work yourself.
With basic tools like a saw, drill, level and tape measure, we were able to create a functional coop for about $20.
Here is a list of the materials we used in my $20 coop and where you might be able to source your own.
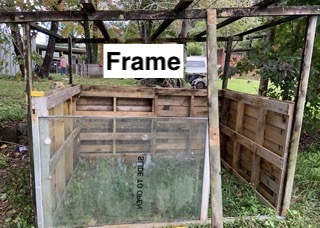
Chicken coop frame
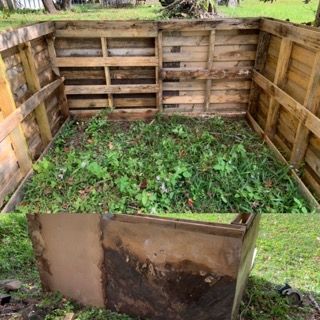
We used timber pallets for 3 sides of the coop. I could have put the roof right onto the pallets, using them as the sides and the frame. But I wanted a coop I could stand up in, so we recycled some timber posts from an old greenhouse and attached them to the pallets to make the frame. Because the open-faced "square" of pallets was quite steady, we didn't worry about fixing the frame to the ground.
Cheap chicken coop materials you might be able to use include:
- Timber pallets and large plastic bread trays make sides and a frame in one
- Old furniture and fencing can be deconstructed to make posts
- Small coops can be made using trampolines, tables, play equipment etc. as a frame
Best tip: Box-frames for the roof are much easier to snake proof than exposed or overhanging eaves!
Chicken coop roof
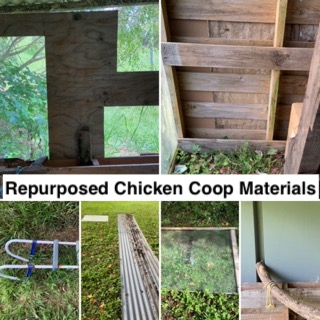
I was lucky to have corrugated iron off-cuts lying around, which we were able to use as a roof for the chicken coop.
Cheap roofing materials for a chicken coop include:
- Old roofing and off-cuts
- Timber covered with thick builder's plastic or a tarp keeps rain out, but you need to check regularly for holes to ensure the timber doesn't get wet and degrade
- Halved rain tanks, both plastic and metal
- Ute tray canopies and covers
Best tip: Old roofing is often found on the side of the road and with a little work makes a respectable roof!
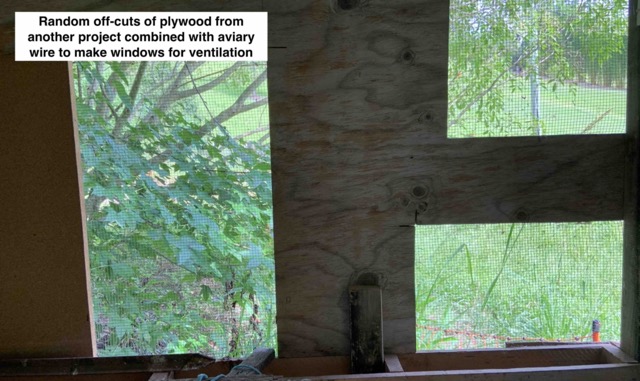
Chicken coop sides
A water-bottling plant near us throws out piles of melamine sheets every month or so. We fixed these to the timber pallets as siding, along with some off-cuts of ply and roofing panels. If I'd had more melamine, I would have layered it for better insulation and predator protection. If it was a longer-term coop, I would have painted the melamine to protect it from the weather and make it last longer.
I wanted a bright coop, to encourage egg production and keep the chickens warm in winter, so we used a sliding glass door without a frame as one side and some clear polycarbonate roofing as another. But windows are totally optional, as long as your chickens aren't spending a lot of time in the coop!
Chicken coop siding materials include:
- Solid timber pallets
- Old doors and windows
- Fence pickets, decking boards or the boards from pallets, lined with Lino, plastic, thick cardboard or wire to prevent cracks
- Aviary, bird or mouse wire (the holes in chicken wire are too big, so it doesn't keep snakes or rodents out!)
Best tip: Cool climates need solid walls, warm climate coops can be wire-sided. In all climates, aim for a solid wall on the side of the prevailing wind and ensure good ventilation.
Chicken coop door
For the coop door, we used a flood-damaged house door with the bottom cut off where it had swelled from the water. Rather than leave the door open to be damaged by the weather, we cut a chicken-sized door into it.
The chicken door is metal and slides in runners on either side of the door. It is lifted with a piece of string that is hooked onto a nail while the door is open. This type of chicken door also works well with an automatic door opener. The chicken door is slightly off the ground to deter predators and pest birds, but unfortunately a goanna still got in!
Doors for a chicken coop:
- Old doors or windows
- Solid sheets of plywood, metal or timber
Best tip: If you only need to access the coop rarely, consider a smaller door or a removable side-panel, e.g. a sheet of timber in runners, rather than a hinged, human-sized door.
Chicken coop floor
I didn't initially plan to have a floor in my chicken coop - I was going to put down 10 cm of sand instead. But the coop wasn't as well positioned as we thought, and became a river when it rained. So in the end we put down a flood of pallets, raised up on bricks and topped with plywood.
Next time, I would put down the pallet floor as part of the chicken coop frame. And choose the spot better!
Chicken coop floor materials:
- Timber pallets
- Old bricks or pavers
- Gravel, sand or dirt, depending on drainage
- Wire mesh
- Lino, ply or builder's plastic (protect with a thick layer of litter)
Best tip: In areas with digging predators like foxes and quolls, a solid flood is essential. But you can use a dirt or sand floor if it is securely lined with wire.
Chicken coop fixtures
Fixtures like screws and hinges can be expensive. Even though we had almost everything we needed, we did have to spend $20 on roofing screws for the coop.
We were lucky because the door we recycled already had a handle and hinges, and we had saved the screws from the greenhouse we repurposed to make the frame.
Cheap chicken coop fixtures:
- Recycle screws and nails from timber pallets and other structures
- Use existing frames and structures, such as pallets or furniture
Best tip: Think about what fixtures you can improvise. Do you need a door handle, or hinges? Can you use a wooden latch, or sliders?
Roosts
For roosts, we used large diameter gum branches tied to the pallet sides of the coop (they can also be screwed to the sides of the coop). An old pool ladder makes a great set of steps for the chickens to get up and down.
Chicken roost materials include:
- Sticks and branches
- Ladders
- Fence pickets, decking boards, 2x4 off-cuts and other timber
- A non-solid pallet suspended from the sides of the coop
Best tip: Roosts should be at least 4.5 cm wide if they are square, or 5 cm in diameter if round. Chickens actually prefer relatively flat roosts.
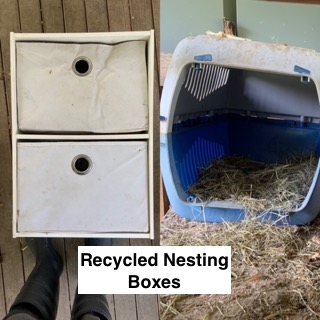
Nesting boxes
We started out with an old cat carried on a shelf as a nesting box. The hens loved it, but tended to roost on top of it and cover it in poop. So we replaced the cat carrier with a set of shelves someone was throwing out. This increased the number of nesting boxes, and stopped the poop issue, but did mean the nesting box was no longer removable for cleaning!
Recycled nesting boxes:
- Pet carriers
- Grass catchers from mowers (plastic, not material)
- Sets of drawers or shelves
- Baskets
- Plastic tubs
- Cardboard boxes (replace regularly)
- Milk crates
Best tip: Ensure the nesting box has a lip to prevent eggs rolling out, and stop chickens from roosting above them.
And for those looking for a bit nicer option, we also sell Australian-made nesting boxes in our store!
How I built my $20 chicken coop
For a cheap chicken coop, it is best to plan the coop design around the materials you have. With that in mind, this is how we built my coop:
Step 1
We made 3 sides of the coop with the timber pallets and screwed them together. If I’d intended to add a floor, I would have put it in as well. Because we didn’t add a floor initially, we had to retrofit, which was much harder as we were working around the nesting boxes etc.
Step 2
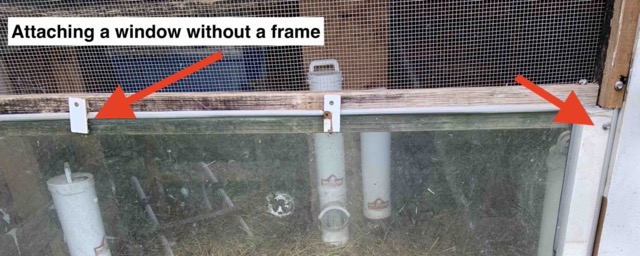
We added the ‘window’ (a sliding door without a frame, installed on its side) and fixed it in place by screwing the frame to a pallet on one side and a post on the other.
Rather than frame the window properly, which would have been fiddly, we just put a piece of timber between the pallets to either side and used small pieces of wood to hold the window in place. Where there was some remaining frame, we screwed the window to the timber directly.
Step 3
We constructed the frame, including rafters for the roof. And then we added the roof.
Step 4
We attached the wire siding first and then the solid siding. Doing the wire first meant the overlap of solid siding helped better secure the wire against snakes etc.
We plugged any gaps in the siding and roof with builder’s foam and some foam infill.
Step 5
We added all the extras. This included trimming the door, cutting the "chicken door" and making the metal cover. We installed the door and fitted out the nesting boxes, roosts etc.
Tips and tricks for a low-cost chicken coop
The reason my chicken coop was so cheap was because I didn’t have to buy any materials. All I needed was some screws!
For the cheapest chicken coop, build it yourself and think about what type of materials you can get for free or cheap.
Here are some of the best sources for free chicken coop materials:
- Council throw outs
- Greenhouses, sheds etc. offered for free on Facebook and Gumtree if you take them down
- Skip bins, particularly at building sites (ask permission first!)
- The side of the road – it’s amazing what you can find!
Cheap building materials may also be found at tip shops and salvage yards, as well as online.
If you don’t have a lot of building skills and only need a small coop, repurposing another structure is often the cheapest option. All of the following can be easily made into a snug chicken coop:
- Tables
- Old rain tanks
- Garden sheds
- Aviaries
- Cubby houses
- Dog houses
Free chicken coops can also be found online, often with the inhabitants, if you are able to transport them. Keep in mind many of these coops are made of cheap timber and may not last without weather protection.
All second-hand materials that have been in contact with birds, e.g. aviaries, chicken coops, should be disinfected before introducing them to your flock.
Building your “forever coop”
If you are building a “forever” chicken coop, then consider the longevity of the materials you are using as well as the price.
Even if the materials are free, if you are going to have to replace them in a few years’ time it might be worth investing in more long-lasting materials if the coop needs to last a long time.
Other recommendations for building a “forever coop” include:
- Don’t skimp on predator-proofing or rodent-proofing. At some point, you will have both predators and rodents. By doing things properly the first time, you will protect your chickens, avoid annoying retrofits and prevent problems down the track.
- Provide plenty of room. Chicken math is a real thing, and flocks will grow – ask any chicken keeper! Read about coop sizing.
- Ensure you have a good run or room to build one. Most chicken keepers eventually get tired of chickens ruining the gardens or pooping on the veranda!
In my “forever coop” here are a few changes I am going to make:
- A dropping’s board (it makes cleaning SO MUCH easier!)
- Roll-away nesting boxes that can be accessed from outside the coop (clean shoes and cleaner eggs!)
- An automatic chicken door (no more early morning wake ups to let the chooks out!)
- An in-coop brooder with a separate yard for setting hens and new chicks
Also, don't forget about investing in a quality chicken feeder and waterer. A cheap feeder often breaks down after a while and doesn't prevent feed waste, which ends up costing you more in the long run.
Good luck building your chicken coop. We'd love to see a photo of it and hear about how you saved money! Get in touch!
Rachael at Dine-A-Chook Australia


