
Let’s get your cup working
Most cup problems come down to four things, and nearly all of them are fixable in a few minutes. Answer as you go and we’ll take you straight to the fix.
First up — what is the cup connected to?
DIY systems — here’s everything we know
A cup that plays up on a DIY system is nearly always the system, not the cup.
We can’t fault-find a setup we didn’t design or supply — but we’re not going to leave you stuck either. These are the four causes, in the order worth checking.
- Never plumb a cup straight to mains, or to a tank line with nothing regulating it. That is the one hard rule — it is far more pressure than the valve can hold shut. A header tank fixes it.
- Head height eats your margin. Lubing’s design figure is 35 cm of water above the cup and it is a good target, but it is not a cliff edge — our own 4 litre drinker is taller than that, and plenty of tall DIY columns run for years. What height really does is remove tolerance: down low a cup will seal through a bit of grit or a slight lean, up high it will not. If your column is tall, everything else has to be right. Measure from the cup to the water surface — litres make no difference, only height.
- Mount the cup level. Tipped forward it overflows, tipped back it fills short.
- Airlock. A sealed reservoir stops water flowing. Loosen the lid and listen for the hiss.
- Sediment. Rain and tank water carry grit. One speck on the valve seat and it drips until cleaned. An in-line filter pays for itself.
Isolate it in one test: screw the cup onto one of our 20 L drums, or any container with the water surface under 35 cm. If it behaves there, the cup is fine and the answer is in your system.
Full detail: Lubing Cup Guide · DIY Drinker Guide · DIY components built for low pressure
Bought a complete drinker from us as well?
What is the cup doing?
How does the water get to the cup?
Is it fed through a header tank?
This is the one hard rule with Lubing cups. A cup can be fed from a raised drum or tank, but never straight off mains pressure, or off a tank line with nothing regulating it — that is metres of head, far beyond what the valve can hold shut.
Which describes your setup?
Measure the drop
Measure from the cup up to the water surface when the container is full. Height is what counts — litres make no difference at all.
What did it measure?
There’s your problem
A Lubing cup cannot hold back mains pressure, and it cannot hold back an unregulated tank line either. The valve is simply being forced open — no amount of cleaning or new parts will change that.
The fix: put a header tank between the supply and the cups. The header tank takes the pressure, floats itself off, and feeds the cups gently — which is exactly how our own automatic drinkers work.
Mains Pressure Lubing Header Tank — the part built for this job.
Worth lowering — but it is probably not the whole story
Lubing’s design figure is 35 cm of water above the cup, and that is the number to aim for. It is a safety margin though, not a cliff edge — our own 4 litre drinker stands taller than that and behaves perfectly, and plenty of people run tall DIY columns for years without a drip.
Here is what is actually going on. The float has to hold the valve shut against the water pushing on it. Down low there is plenty of margin. Up past a metre that margin is nearly gone — so a speck of grit, a slightly worn seat or a cup mounted a little off-level turns into a drip, when the very same cup would seal fine lower down. Height rarely causes the leak by itself; it removes the tolerance for everything else.
Worth doing: bring the water surface closer to the cup if you can. Then carry on with the checks below, because on a tall system the valve is usually where the fault really is.
Check the cup sits level
Stand square in front of the drinker and look at the cup. It should sit upright and level, not tipped forward or leaning to one side. An off-level cup changes where the float sits against the valve — tipped forward it can overflow, tipped back it fills short.
Check the drinker itself is hanging straight too, not leaning off a post or a sagging mesh panel.
How does it look?
Straighten it up first
Re-hang the drinker so it sits plumb and the cup is level, then refill and give it an hour. This one is easy to miss, because a small lean does not look like much — but the float only has to sit slightly differently to change where the valve shuts off.
Pull the valve out and look at it
Unscrew the cup from the drinker, then take multigrip pliers and pull the nipple valve out of the top of the cup. It comes out in two parts. This is the bit that actually stops the water, and one speck of grit on it will keep a cup dripping forever.
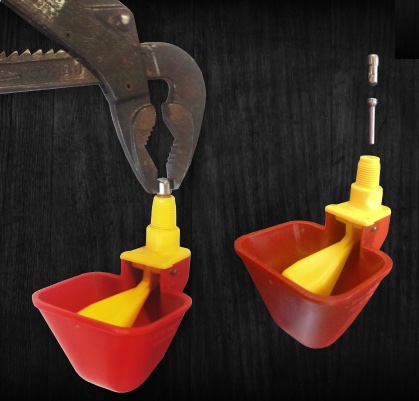
Look closely at the valve. What do you see?
Give it a proper clean
That’s the most common cause of a dripping cup, and it’s a ten-minute job:
- Grasp the pin on the side of the cup with pliers, draw it halfway out and the float drops free.
- Wash the cup, float, pin and both valve parts in warm soapy water with a soft cloth. No boiling water, no dishwasher, don’t scrub.
- Empty and rinse the drinker itself — if there’s sediment in the bottom it’ll be back in the valve within a day.
- Reassemble: float in, pin home, valve back in smaller pin first.
- Check the pin and nipple spin freely with your fingers. If they spin, it will work.
On rain or bore water this is a fortnightly-to-monthly job, not a one-off. An in-line filter cuts it right down. Full strip-down with photos
Check the float can move
With the cup back together, lift the float with a finger and let it go a few times. Litter, feed or a strand of grass caught above or under the float will hold the valve open just enough to drip.
Does the float move up and down freely?
Clear it and re-check
Take the float out (pliers, pin halfway, float drops), clean it and the inside of the cup, and refit. While you’re there, check the mounting height — a cup mounted low collects everything the flock kicks up, and that is usually why litter ends up in it.
Press the float down
Make sure there’s water in the drinker, then press the float down with a finger and hold it.
Does water flow into the cup while you hold it?
Loosen the lid
A drinker sealed tight can’t let air in, and without air the water can’t come out — an airlock. Undo the lid on your drinker and listen.
What happened when you loosened it?
That was an airlock
Leave the lid sitting on loosely rather than done up tight, and the drinker will keep feeding the cups. If your lid has a vent hole, check it isn’t blocked with dust or a sticker.
Airlocks are most common on DIY reservoirs, but any drinker can do it if the lid is over-tightened.
Unscrew the cup and look at the O-ring
Take the cup off the drinker or outlet frame. The O-ring sits on the thread at the top of the cup — it’s the only thing sealing that joint.
What state is it in?
That’ll be it
A tired or missing O-ring is the usual reason for a weep at the thread. Fit a fresh one on the thread, then screw the cup in firmly — snug, not forced. Over-tightening pinches the O-ring and makes the leak worse.
Replacement O-rings, 10-pack — $7.95 · worth keeping a few spare.
Check the collar for a crack
Look closely at the threaded collar on the cup, and at the fitting it screws into. Turn it to the light — you’re looking for a hairline split or a pale stress line running around the plastic.
Can you see a crack or split?
Which float is in the cup?
Your cup came with two floats: the original Lubing float fitted in the cup, and a coloured Dine-A-Chook upgrade float loose in the bag. Both refill automatically — the upgrade one simply lets the cup fill a bit higher before the valve shuts.
The loose float in the bag is not a spare. It’s the upgrade. If you never swapped it in, your cup is running at the standard level by design — nothing is broken.
Look in the cup. What colour is the float?
Swap in the upgrade float
You’re running the original float, which shuts the valve at a lower level. Fit the coloured one from the bag and the cup will hold noticeably more water. It takes about a minute:
- Grasp the pin at the side of the cup with pliers and draw it out halfway.
- The fitted float drops out. Put the coloured float in its place.
- Push the pin back home.
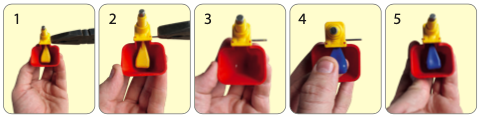
Lost the upgrade float? Replacement floats are $2.95.
Right — let’s take it from here
You’ve done the checks that solve most cups, so this one needs us. Your answers come through with the message, so we won’t ask you to repeat any of it.
Nice work
Give it a day and keep an eye on it. A quick rinse each week and a proper strip-down every fortnight to a month will keep it behaving for years.
Worth having on the shelf: spare O-rings and a spare float.
Read the full care guideNot actually sorted?
Got it
Your checks came through with the message, so we already know what you’ve ruled out. We’ll be back to you within 1 business day.
Check your inbox — and the spam folder, just in case.
Back to the shop